We’ve mentioned this one a lot, and for good reason. Jay Cooke has a great naturalist program that puts a strong emphasis on snowshoeing and other wintertime adventures. You can rent snowshoes on site as well as take a guided snowshoe tour (when scheduled). You can also head out on your own snowshoe hike and use their many miles of hiking trails. You can hike alongside, or even over, the St. Louis River.
Our favorite route takes you over the historic Suspension Bridge (AKA The Swinging Bridge), which is just as great in the winter as it is in the summer.
Getting There
Park at the River Inn Visitor Center and take the trail heading south, right over the Swinging Bridge. You can’t miss the bridge! After crossing over the bridge, take a right and head west along the St. Louis River on the Carlton Trail. This will eventually meet up with the Willard Munger State Trail, which you can follow to the Forbay Trail which will lead you back to the River Inn Visitor Center.
The first and last parts of this trail do bring you along groomed trails. Please stay to the edge of the groomed trails as to not disturb the grooming for skiers and fat bikers. The Willard Munger State Trail is an active snowmobile trail. Use caution and stick to the side of the trail and move off to let snowmobiles pass.
Map
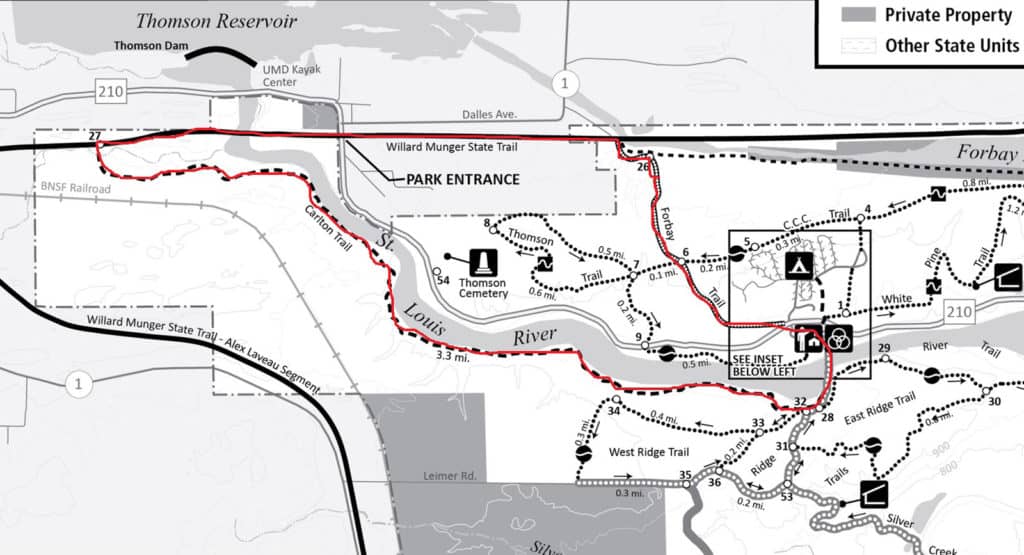
Click Here to View the Jay Cooke State Park Winter Map (PDF)
This is one of our favorite fall hikes, so it’s only natural we’d recommend it for wintertime exploration, too.
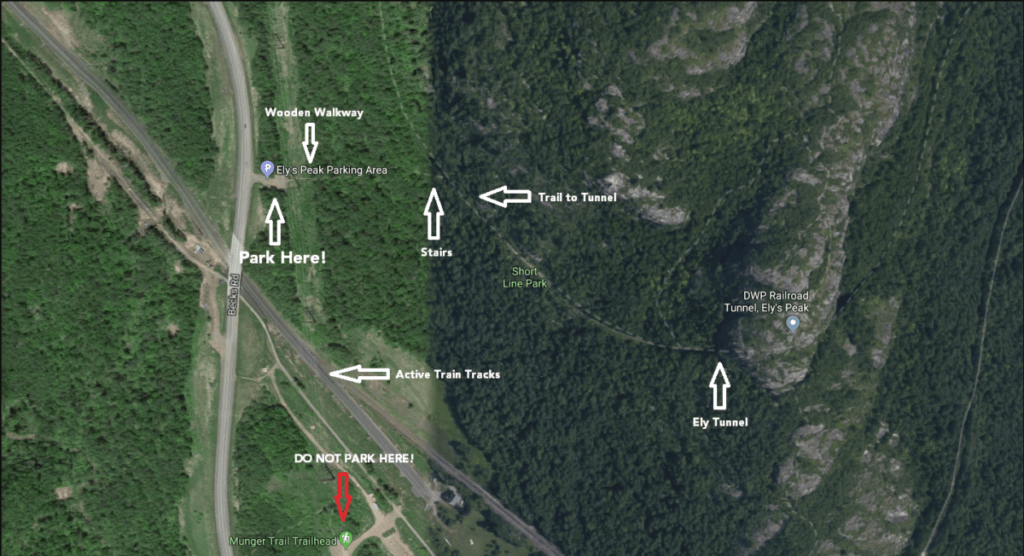
This short, relatively easy hike (there are stairs, which in the winter will just be a steep hill) will bring you to Ely Tunnel, an abandoned train tunnel that is not a part of the Superior Hiking Trail.
This is an out and back trail, although you can easily keep going to explore more of the Magney-Snively Park along the SHT or the Munger Trail.
Getting There
Other online resources can make the tunnel appear difficult to find. In fact, we’ve heard first hand that finding the tunnel can be tricky. However, this is usually due to visitors not knowing exactly where to park and enter Magney-Snively to find the tunnel. Turns out, getting there is pretty easy! At least, it is if you park in the right place!
The problem is, most people start from the Munger Trail Trailhead, which leads you along several forked paths. Take the wrong fork and you may not end up at the tunnel. If you enter “Ely Tunnel” into your navigated it will like try to have you park at the Munger Trail Trailhead, even. But, if you park at the Ely’s Peak Parking Area, the path to the tunnel is actually very simple and direct. We imagine it would be hard to get lost taking this route, in fact. Just follow the map below and click on the Ely Tunnel article link above for more directions.
There are miles and miles of hiking trails that lead through the Magney-Snively Park. So feel free to go on a longer hike/adventure after visiting the tunnel.
Map
The Lester River Trail begins in Lester Park. From there, you can snowshoe along the scenic Lester River. This could be an in and out route, or a loop.
This is an easy-access, longer trail in the heart of Duluth. The full loop is about 6 mi (9.6 km). You will encounter the Lester-Amity Ski Chalet halfway down the Amity East Trail.
Getting There
Head to Lester Park at the intersection of Superior Street and 61st Ave. This is where the east and west branches of the Lester River come together. The main entrance is to the west of the Lester River about one block up from Superior Street. Park in the marked parking area. The Lester River Trailhead will be to your right if you are looking into the park.
For the full loop just follow the Lester River Trail until it meets up with the Amity East Trail. This trail will take you along Amity Park and Seven Bridge Road. Amity East Trail then reconnects with the Lester Park Trail at the trailhead.
These are multi-use trails, not groomed cross-country ski trails. Please stay off the cross-country ski trails with snowshoes. On the map, look for the purple line that starts at the bottom of the map and runs just to the west of the Lester River. That is the Lester River Trail. Then, the Amity East Trail is the purple line that runs to the east of Amity Creek and Seven Bridges Road. The black arrows on the map below mark the correct trails to take.
Map
![]()
Gooseberry Falls State Park is a mecca of outdoor activity in the winter months. The park features groomed ski trails, snow-cleared hiking trails, and ungroomed snowshoeing trails. For snowshoers, you have the choice of two popular loops that lead you along the Gooseberry River visiting two waterfalls on each loop.
Gooseberry Falls is one of the area state parks that hosts numerous snowshoeing events throughout the year. Be sure to check out the Minnesota DNR Website for a list of scheduled events to see if any are happening during your visit. While Gooseberry hosts snowshoeing events, they do not have snowshoe rentals. A limited number of adult snowshoes are available for those participating in a scheduled event.
Getting There
Gooseberry Falls State Park is located between Two Harbors and Beaver Bay. You will spot the entrance to the park on the lakeside of the Highway. It sits about 13 miles from Two Harbors and 12 miles from Beaver Bay.
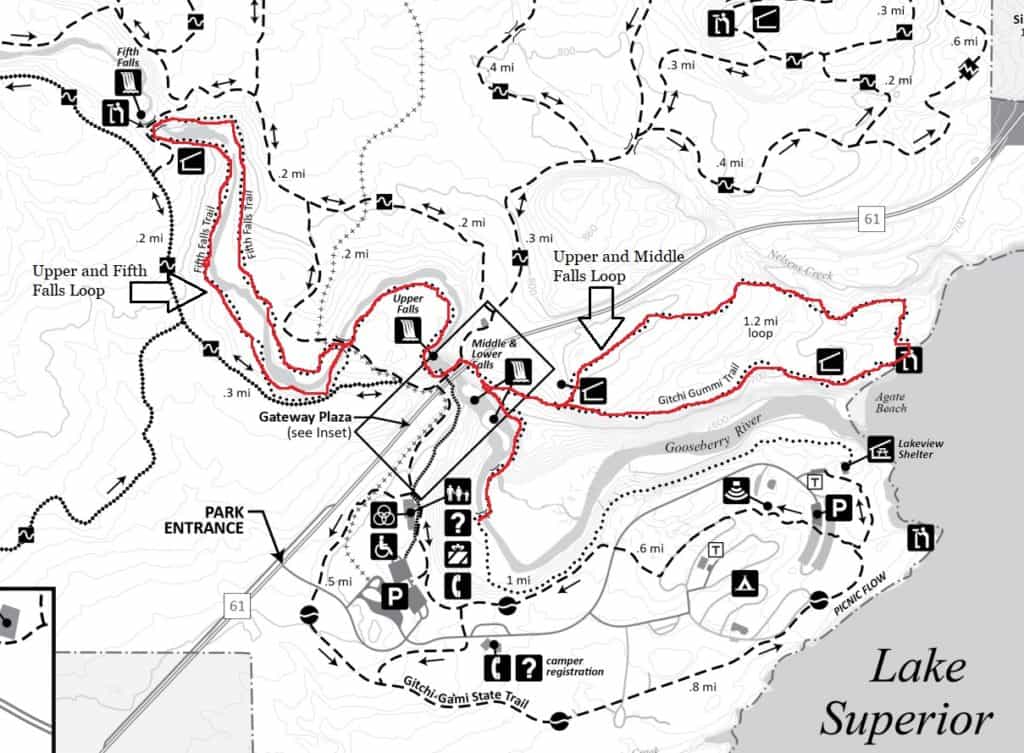
Park at the Visitors Center and then enter the trails in front of the Visitors Center. Both Trails start by crossing the foot bridge over the Gooseberry River and then going up to the highway overpass. The Middle and Lower Falls Loop splits off to the right and the Upper and Fifth Falls Loop goes to the left under the highway overpass.
The Middle and Lower Falls Loop is a 1.2 mi (2 km) route that takes you along the Gooseberry River on the Gitchi Gummi Trail. From there, you can either return to the Visitor Center or continue on the Upper and Fifth Falls Loop.
The Upper and Fifth Falls Loop is a 2 mi (3.2 km) route that takes you along the Gooseberry River on the Fifth Falls Trail.
You can easily do both loops for a total 3.5 mi (5.6 km) route. Both loops are marked on the map below in red. Look for the black arrows labeling the loops.
Map
Start your journey to Wolf Rock just past the Rustic Inn at the Castle Danger Trailhead. The trail is part of the Superior Hiking Trail. It’s a bit of an incline, but the Lake Superior view from Wolf Rock are incredible!
From Wolf Rock you can follow the Superior Hiking Trails all the way over to Gooseberry Falls State Park. So, you can do a quick out and back hike or continue on to Gooseberry Falls. Just remember, you eventually have to get back to your car by Wolf Rock! There’s 9 miles (14 km) between the Castle Danger Trailhead and the Gooseberry Falls Visitor Center. That can make for a long hike if you take the SHT both ways!
Getting There
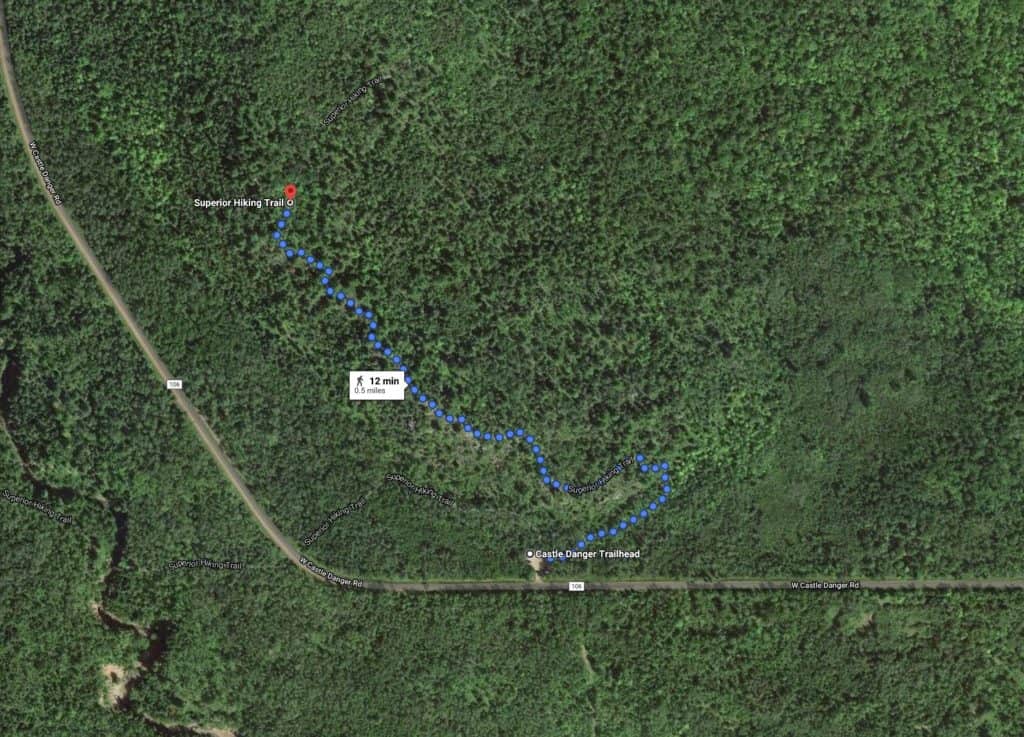
From Highway 61 turn onto Lake County 106 (left if coming from Two Harbors and right if coming from Beaver Bay). You’ll turn right at the Rustic Inn in Castle Danger. Drive 2.3 mi (3.7 km) and park in the Superior Hiking Trail parking lot on the right side of the road. Take the hiking trail that is furthest to the south (if your back is to the road, it will be the trail furthest to the right).
Wolf Rock is located about 0.5 mi (0.8 km) up the Superior Hiking Trail from the Trail Head.
If you do decide to continue on and take the SHT all the way to Gooseberry Falls, the hike can be challenging at times, but amazing! You’ll pass the Crow Valley Camp, Mike’s Rock, and follow along the Gooseberry River.
Map
Click Here to View the Superior Hiking Trail Castle Danger to Gooseberry Falls Map (JPG)
Like Gooseberry Falls State Park, Split Rock Lighthouse State Park is a great place to go for all sorts of wintertime activities. This includes several miles of snowshoeing and fat bike trails. But, unlike Gooseberry Falls State Park, there are no groomed cross-country ski trail here. So snowshoers are welcome on all trails.
While there are a lot of trails to pick from, our personal favorite route is the TheSplit River/Split Rock Creek Loop. Of course, you have many options, so feel free to just get out and explore this great state park!
Getting There
You can always pull into Split Rock Lighthouse State Park, park, and enjoy the park. To get there from Highway 61 turn into the entrance of Split Rock State Park on the lakeside of the highway. Stop and pay for the required day permit, unless you have a parks permit, at the ranger station.
However, for the purpose of this route, you’ll actually want to park at the Split Rock River Wayside Rest, which is on the inland side of Highway 61 about a mile down from the park entrance.
Once in the wayside rest, locate the snowshoeing trail that heads north along the western side of the Split Rock River. This 0.5 mi (0.8 km) trail will lead you straight to the Superior Hiking Trail’s Split Rock River Loop.
The Loop takes you up the western side of the Split Rock River for 1.8 mi (2.9 km) and then back down on the eastern side for 1.6 mi (2.6 km), eventually moving southeast away from the river.
At the bottom of the Split Rock River Loop you will meet back up with a short snowshoe trail that will connect you to the Merrill Logging Trail, which is part of the Split Rock Lighthouse State Park trail system. Follow that down until it connects with the Gitchi-Gami State Trail and take that heading east. You will come to a Highway 61 Underpass that will lead you right back to where you started at the wayside rest.
Total distance for this loop is about 4.5 mi (7 km). We’ve marked this route in red on the map below.
If you hit the point where the SHT and the short snowshoe trail connect and decide you want to continue on a bit longer, just stay on the SHT until it connects up with the Merrill Logging Trail by Split Rock Creek. This will add 1.9 mi (3 km) onto your trip. We’ve marked this added section in green on the map below.
Map

Click Here to View the Split Rock Lighthouse State Park Winter Trail Map (PDF)
If you want to try your hand at an easy river-hike, look no further than the Beaver River.
The river runs under Highway 61 which allows for easy access right from the highway. It’s a gently sloping river small, cascading waterfalls. So if you want to do just a shot out and back hike on a river, check out this hike.
However, for the purpose of giving you a slightly longer and more challenging hike, we recommend leaving from the Beaver River Trailhead which is located a quarter-mile (1.2 km) up from Highway 61.
Note: If you decide to do river hiking please be sure that the ice is thick enough to walk on. You should only hike on river this close to Lake Superior after a cold snap with multiple days of below-freezing temps. Look at the river from the highway overpass before heading down to see if you can spot open water. If there’s open water on the river, it’s likely not safe to hike on. When in doubt, play it safe.
And remember, the ice is never 100% safe! Always use caution when snowshoeing or doing any other activity on frozen river.
Getting There
Take Highway 61 to just outside of Beaver Bay (after passing through town if coming from Two Harbors and before town if coming from Silver Bay). Turn onto Lax Lake Road.
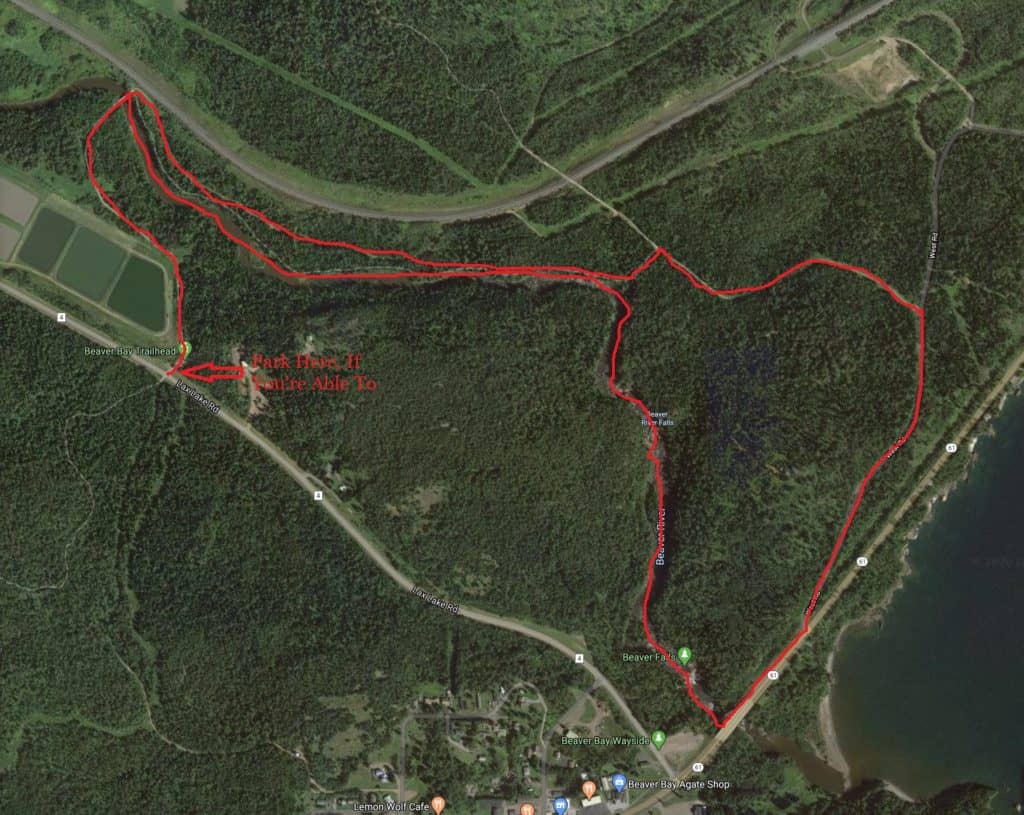
Drive a 0.75 mi (1.2 km) up until you see the Beaver Bay Trailhead on your right. Parking may be tight here, especially in the winter. Just be careful with where you leave your vehicle.
From the trailhead, head northeast to the Beaver River. The SHT crosses over the Beaver River. At this point, you can test the river ice depth to see if it’s safe to walk on, or, if it’s not, continue on the SHT.
If the ice is thick enough: Follow the Beaver River all the way to Highway 61. From there, you can walk alongside Highway 61 heading east for a few hundred feet until you reach West Road. Take West Road for 0.4 mi (0.6 km) until you see the SHT trail on your left. Take this wider part of the SHT until it meets up with the Beaver River section of the SHT on your left (roughly 0.3 mi/0.5km). Follow the Beaver River Trail back to the trailhead where you started.
If the ice is not thick enough: Stay on the SHT and follow it until it comes to a T with a wider section of the SHT. Turn right and follow the trail until you hit the next T at West Road. Turn right onto West Road and take that down to Highway 61. Turn right again and follow that back to the river. You can either double back to the way you came to return to the trailhead, or walk alongside Highway 61 and take Lax Lake Road back up. Note: there are no sidewalks along Lax Lake Road and the road tends to be pretty narrow in the winter. We recommend doubling back, although this route will be faster.
If you are able to take the river, which we hope you are, then the entire loop is about 3.5 mi (5.6 km).
We’ve only marked the loop taking the river on the map, although you can identify the alternative route by following the return path. This area is part of a much larger section on the SHT. Should you want a longer hike, the possibilities are endless!
Map
Click Here to View the Superior Hiking Trail Beaver Bay to Silver Bay Map (JPG)
If you thought this route was challenging enough during the summer months, just wait until you experience it during the winter months! Although, as it’s less traveled than in summer months, so you can enjoy a peaceful hike to a beautiful overlook. But note, the hike includes a changing elevation of over 1,000, although it’s done gradually. Regardless, poles strongly recommended!
You can do this route as an out and back hike or do the full loop. For the purpose of this post, we’ll guide you through the full loop. Just know that if you want a short hike, just turn around once you reach the Bear Lake Overlook. Although doing the full loop really doesn’t add much distance to the overall hike. There’s only a 0.2 mi (0.3 km) difference between the two.
Getting There
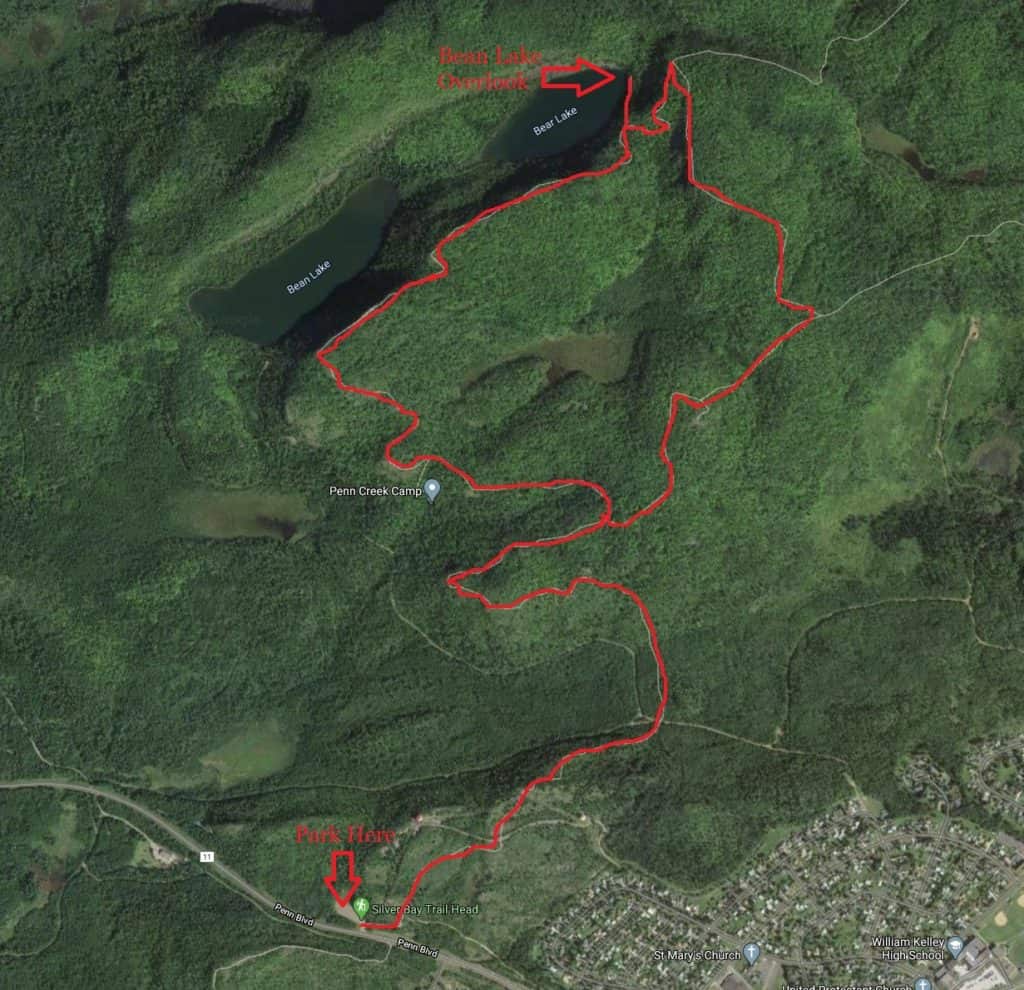
From Highway 61 turn into the town of Silver Bay (at the seemingly random set of stop lights along the highway). You turn into town onto Outer Drive. Continue onto Outer Drive through town (it eventually turns into Penn Blvd). After about 2 mi (3 km) on this road you will see the Silver Bay Trailhead on the right. Park your car and then head out on the SHT!
After about 1.5 mi (2.4 km) you will come to a Y in the trail. This is the start of the loop. Take the left fork to head to Bean and Bear Lake.
After about 0.75 ml (1.2 km) you should be able to start seeing Bean Lake below you. Continue on until you reach the spur trail leading to the Bear Lake Overlook on the other side of Bear Lake. Stop. Enjoy the view. Seriously, it’s beautiful.
Like we said earlier, at this point you can turn around and go back the way you came. Or, continue on the loop and enjoy a new set of surroundings until you meet back up with the first part of the trail at the end of the loop.
Then just take the initial trail back to the parking area at the Silver Bay Trailhead.
Map
Click Here to View the Superior Hiking Trail Beaver Bay to Silver Bay Map (JPG)
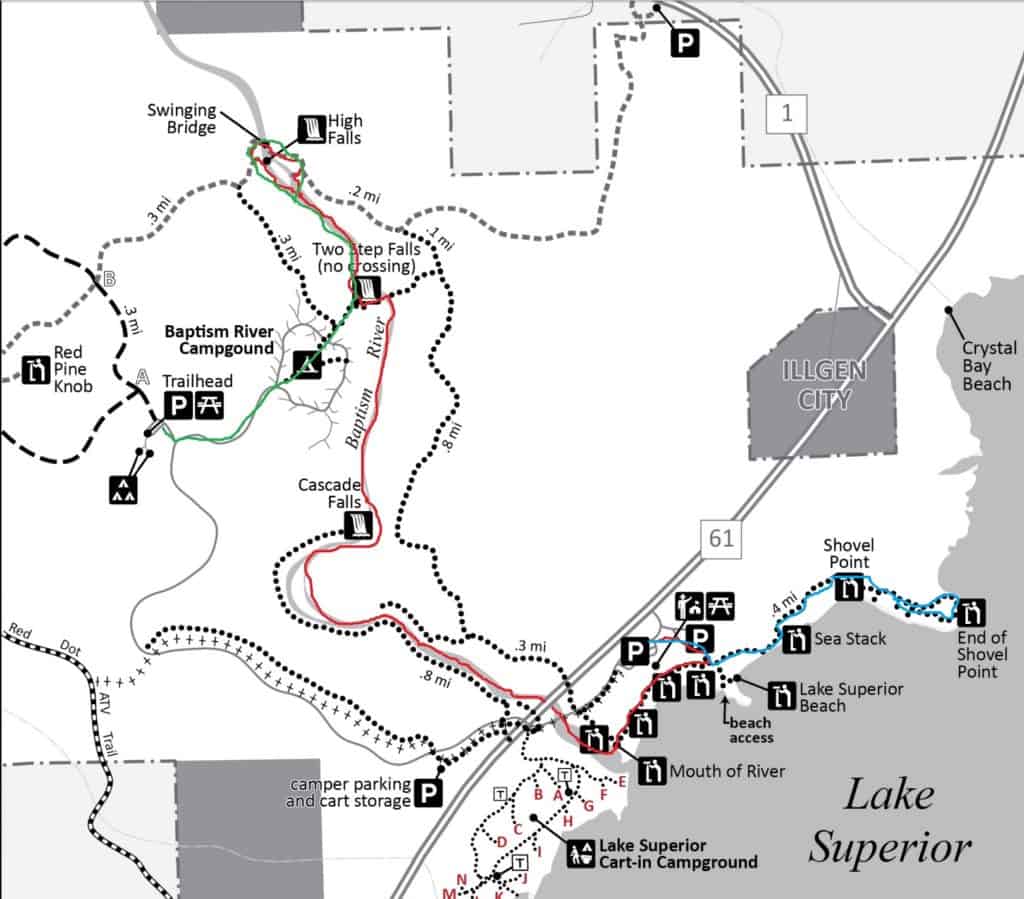
Snowshoe up the Baptism River, located within the Tettegouche State Park. Along the way you will see not one, not two, but three waterfalls! This is a route you will only want to take during the coldest part of winter. The river will need to be frozen for this hike to be enjoyable. Stop in at the Tettegouche State Park Visitor Center and speak with their naturalist to find out the best route to take for the current conditions.
Should you go out early or late in the winter, and the river is not frozen, you can still enjoy a beautiful 3-waterfall hike using the designated trail system.
Getting There
Park in the main Visitor Center Parking area and follow the signs to the trail system leading to the mouth of the Baptism River. From there, hike up the river until you hit Cascade Falls. Navigate around the falls and continue up to Two Step Falls. Move around Two Step Falls until you reach High Falls. Be sure to check out the swinging bridge located just above High Falls!
At this point, it’s best to turn around and go back. There isn’t much of a loop using this route, although, for a change of scenery, you can take the hiking trails back rather than the river.
This is a 3-mile out and back hike, marked in red on the map below.
For a shorter trek, you can park in the campground parking lot and take the trail leading to Two Step Falls. Then, head up to High Falls. This will be a 1.5 out and back hike. But, with this route you’ll miss Cascade Falls. This route is marked in green on the map below.
Click the next tab for more information on the route marked in blue on the map below. This is the Shovel Point hike.
Map
Click Here to View the Tettegouche State Park Winter Map (PDF)
If you’re look for a short, easy trail for a snowshoeing adventure with big rewards, check out the Shovel Point hike in Tettegouche State Park.
The trail leads you along the Lake Superior Shoreline on a cliff’s edge to the end of Shovel Point. From there, you can enjoy the view looking towards the mouth of the Baptism River with Palisade Head in the background. Previously, you’d also be able to see the now-gone Sea Arch (which fell in 2010) and Sea Stack (which fell in 2019). Unfortunately, this iconic piece of the North Shore landscape is now gone.
This is an out and back hike that is less than a mile. It follows a gently sloping, well established trail. A great route for beginners and those with mobility issues who want to try out snowshoeing.
Getting There
Park at the Tettegouche State Park Visitor Center parking area and head towards the lake. Follow signs for the Shovel Point trail (it will take you east).
Once you get to the end of Shovel Point, enjoy the view and then return the way you came.
This route is shown in blue on the map below. The Baptism River Hike (long and short) are labeled in red and green on the map. To learn more about those routes, hit the tab above.
Map
Click Here to View the Tettegouche State Park Winter Map (PDF)
No matter the season, Sugarloaf Cove is a beautiful place to explore. The hike has been set-up to not only allow you to enjoy the beautiful scenery, but also learn along the way.
Getting There
Sugarloaf Cove is located just across the border of Cook and Lake Counties, at mile marker 73 on Highway 61 just south of Schroeder, Minn. There is a big sign on the lake side of the road- you can’t miss it! Turn in, park, and then find the trail on the west side of the parking lot. There should be trail maps nearby that you can grab. Or, scroll down to the map section and click to view the PDF map here.
This is a 1-mile interpretive loop. The map will help guide you along the route and you can learn about different natural features along the way. There is also a Visitor Center located just passed the parking lot on the west side. Stop in, if open, and check out the different displays within the Visitor Center.
Note: There is a $5 parking fee. Funds go to keep Sugarloaf Cove functioning and provide visitors with a variety of nature-based activities.
Map
Click Here to View the Sugarloaf Cove Interpretive Trail Map (PDF)
If you are looking for an easy-access trail that will lead you to two scenic waterfalls, look no further than the Temperance River State Park Falls Loop. Accessible from a parking lot right on Highway 61, this is shorter, easy loop that will lead you past the Hidden Falls and Upper Falls on the Temperance River.
Getting There
Take Highway 61 to the Temperance River State Park highway parking area located in between Tofte and Schroeder, MN. If you are coming from the Duluth side, you will find the parking area just outside of Schroeder. If you are coming from the Grand Marais area, the parking area will be just passed Tofte. From the parking area, head away from Lake Superior and find the trail access point. This area is pretty well marked and traveled.
Follow the marked trail up the east side of the Temperance River. River hiking isn’t recommended here as a large portion of this hike is a gorge that can be difficult to get out of it needed. Luckily, the trail goes right alongside the river and provides some beautiful scenery.
The entire hike is a 1.7 mile loop from the parking lot back to the parking lot. It has a small elevation. This is a great hike for those seeking a shorter, easier hike and those who love waterfalls.
Of course, if you’re wanting a longer hike that is more challenging, Temperance River State Park has many hiking trails and options available for you in the winter months. Check out the PDF map below.
Map
Click Here to View the Temperance River State Park Map (PDF)
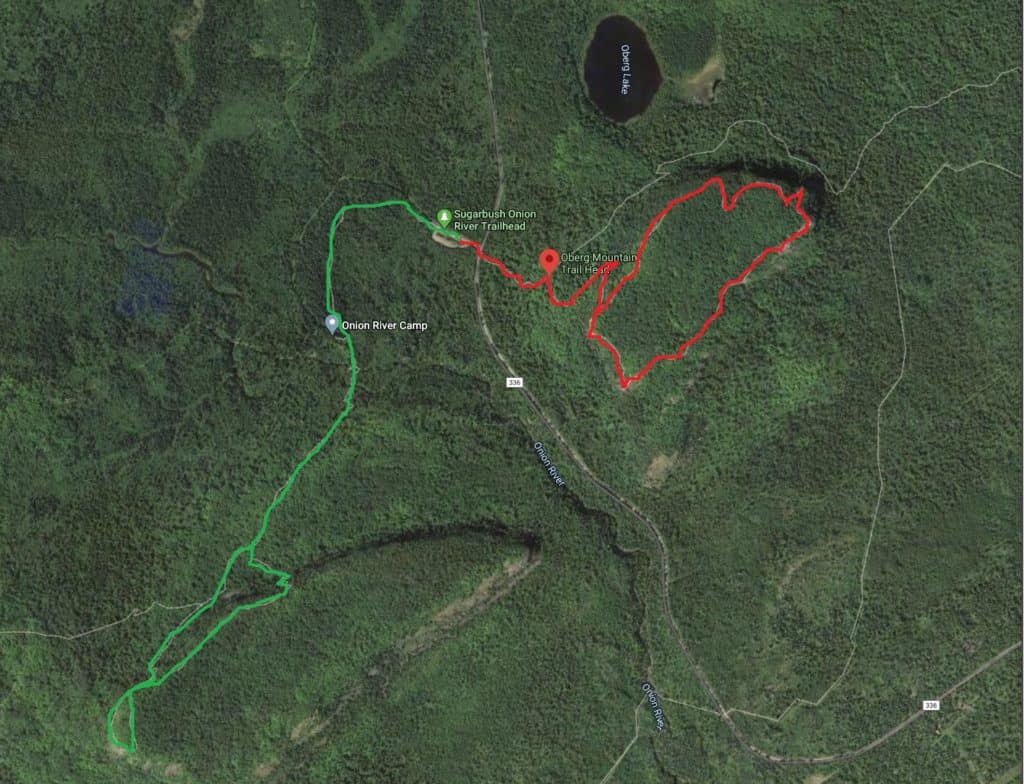
The Oberg Mountain and LeVeaux Mountain Trails are two of our favorites. These popular hikes provide breathtaking views of Lake Superior and Oberg Lake pretty much all year. It’s exceptionally beauty after a recent snowfall.
Choose between Oberg Mountain and LeVeaux Mountain mostly depends on what you want to see and how long you want to hike. And, how likely it is you’ll run into another person. Oberg Mountain provides great views of both Lake Superior and Oberg Lake and at 2.3 miles this loop is the shorter of the two hikes. LeVeaux Mountain is more of a hidden gem and far less traveled. While the views looking north aren’t as beautiful, the views looking south towards Lake Superior are absolutely breathtaking! At 3.2 miles, this loop is almost a mile longer than the Oberg Mountain Loop.
Doing both hikes together would be a 5.5 mile adventure and a great snowshoeing challenge for those wanting to push themselves. Both loops have a fairly steep incline. Both trails are part of the Superior Hiking Trail.
Getting There
From Tofte, head northeast on Highway 61 for about 4.7 miles. Turn left onto Onion River Road, which is marked with a Superior Hiking Trail sign before the turn. From Lutsen, head southwest on Highway 61 for 7 miles. Turn right onto Onion River Road. Once on Onion River Road, drive 2.1 miles until you see the parking area on the left side of the road.
Once parked, you can cross Onion River Road to access the Oberg Mountain Trailhead, or stay on the parking lot side of the road and look to the east for the LeVeaux Mountain Trailhead. If you take the Oberg Mountain Loop you will want to pay attention for when you reach the Oberg Mountain Trail head and turn right. Turning left will lead you on an out and back section of the SHT.
On the map below, the 2.3-mile Oberg Mountain Loop is marked in red and the 3.2-mile LeVeaux Mountain Loop is marked in green.
Map
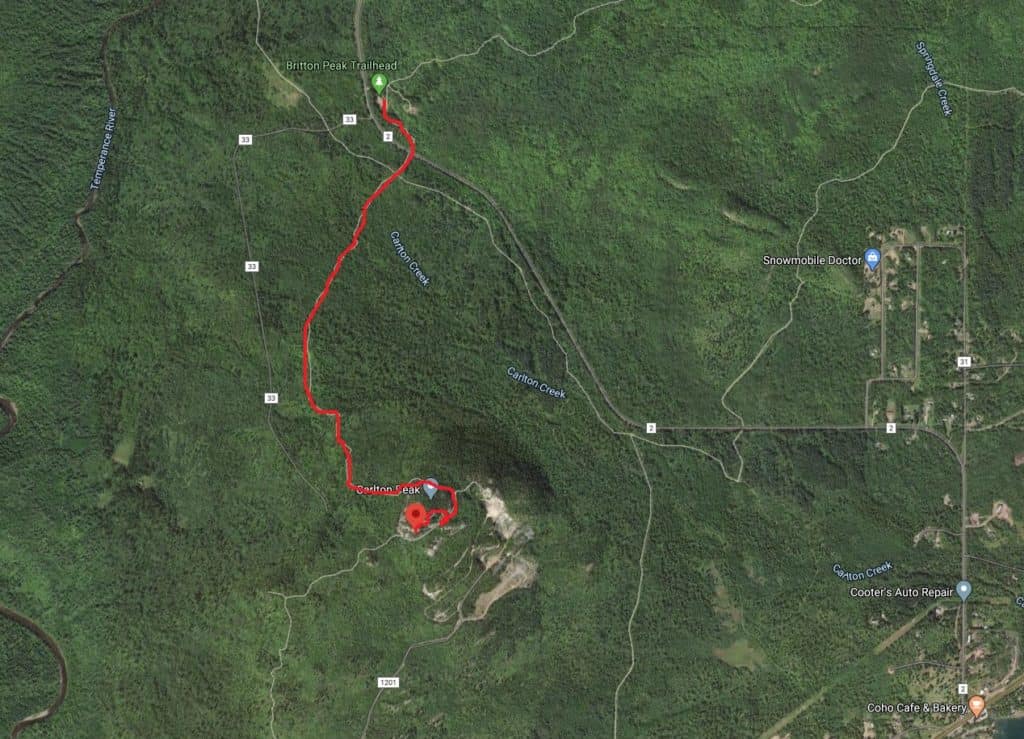
With a 550 foot elevation gain, Carlton Peak is a challenging but rewarding out and back hike. While not the highest point in the area (that title goes to Eagle Mountain near Grand Marais), Carlton Peak definitely sticks out. Standing at 924 feet above lake level, this vantage point will provide you with incredible Lake Superior views if you reach the top.
From the Britton Peak Trailhead, you will enjoy a 3.2 mile out and back hike (1.6 miles each way). For a much longer 6-mile out and back hike (3 miles each direction), you can access Carlton Peak from the Temperance River Trailhead located down by the Highway 61 parking lot for Temperance River State Park. Check out the tab for the Temperance River State Park – The Falls Loop for a better map showing that route.
Getting There
From Highway 61 in the town of Tofte, turn away from Lake Superior onto Country Road 2 / Sawbill Trail. Drive about 2.6 miles up the Sawbill Trail to the Britton Peak Trailhead parking lot located on the left side of the road. You will access the Carlton Peak trail on the south side of the parking lot.
Enjoy the 1.6 mile hike to Carlton Peak. When you’re done enjoying the incredible views, just turn around and head back the way you came.
While not a long hike, this can be challenging, especially in the winter on snowshoes, due to the elevation gain. Poles are highly recommended for this hike!
Map
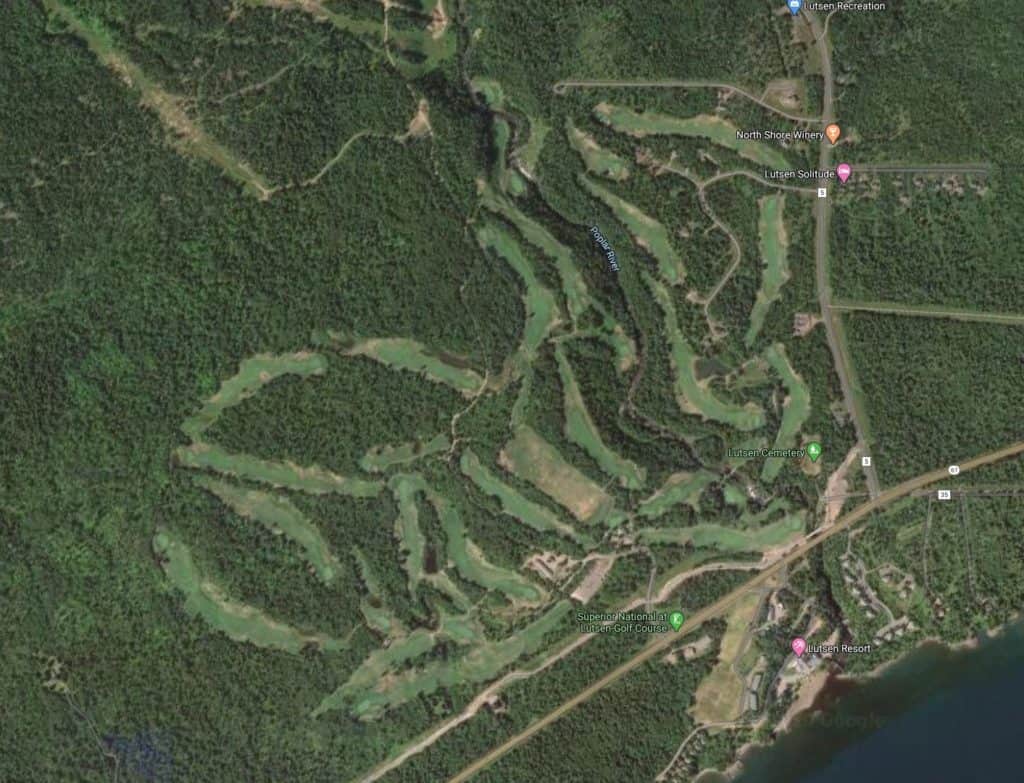
Easy access, small inclines, and wide open trails! Superior National at Lutsen provides all of this, plus great views of Lake Superior. Yes, you snowshoe right on the golf course.
This 27-hole golf course provides several miles of opportunity to have a nice, casual snowshoeing adventure. The golf course is a great option for beginners and families. It’s also ideal for anyone visiting the Lutsen Mountains area who want an alternative activity to downhill skiing without having to leave the Ski Hill area.
Getting There
Look for the Superior National At Lutsen sign on Highway 61 near the road leading to Lutsen Mountains. If you are coming from the Tofte side, the turn into the golf course will be shortly before the turn to the Mountain. If you are coming from Lutsen, it will be after.
Park, strap on your snowshoes, and head out onto the golf course. There’s no designated route to follow, although you should stay off, or walk to the far end of, any trails groomed for fat biking. Otherwise, enjoy the entire golf course. The Poplar River runs through the golf course, and several bridges cross over the river, which makes for great photo ops!
Map
Cascade River State Park is another easily-accessible trail system that has parking right along Highway 61. This State Park has miles of snowshoeing trails that mostly utilize the Superior Hiking Trail. This park features one of our favorite “short and sweet” loop trails that brings you to a beautiful waterfall. But, you also have ample options of longer trails that lead around the scenic park.
Getting There
On Highway 61 in between Lutsen and Grand Marais you will find your speed suddenly slowing down to 40 MPH. When that happens, you’re entering Cascade River State Park. There is parking on either side of the highway. If you are coming from Lutsen the parking area will be after Cascade Lodge and Restaurant. If you are coming from Grand Marais, it will be before you reach the restaurant.
We’ve marked two trails for this State Park. The first is our “short and sweet” loop that brings you to the Cascade falls. The entire loop is about 0.1 miles. A great place to stop and snowshoe if you really just want to see a pretty waterfall and have a quick snowshoeing adventure on your way to doing other things. This route is marked in red on the map below.
The longer loop, which totals about 1 mile, takes you past the Cascade Falls to the Upper Falls. Then, you’ll wind along trails above Cascade Lodge before looping back down to the parking area. This route is marked in green on the map below. Note that 0.4 miles of this trail are along groomed cross-country ski trails. Please to not walk on the groomed trails. Rather, stay to the edge along the treeline as much as possible.
For an even longer route you could continue on the Superior Hiking Trail and head to Lookout Mountain, and then loop back around in a figure-8 shape back to the river. This route is not marked on the map, but you can click on the State Park Map (PDF) below and just keep following SHT to Lookout Mountain.
Map
 (
(Click Here to View the Cascade River State Park Winter Map (PDF)
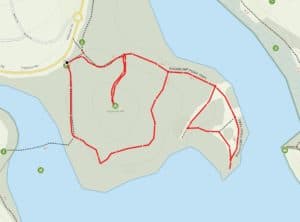
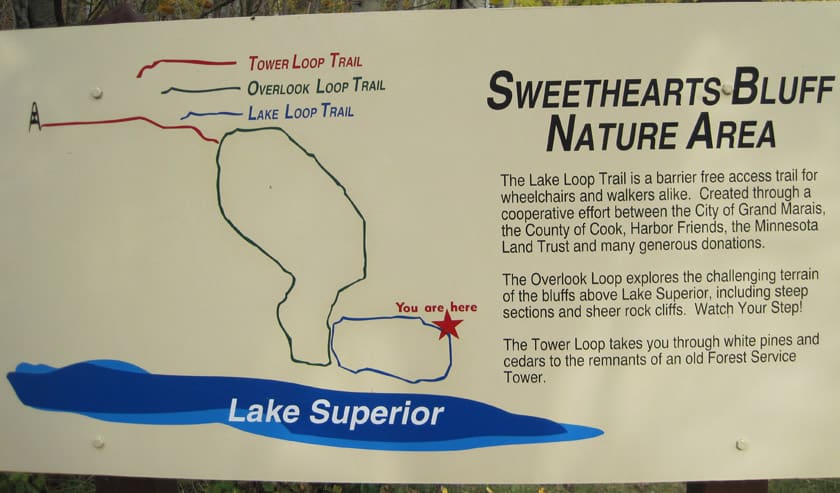
Sweetheart’s Bluff Natural Area is located right in the town of Grand Marais in the municipal campground/recreation area. Getting there is easy, and the two loop trails offer two different experiences for snowshoeing. Both will reward you with incredible views of Lake Superior, downtown Grand Marais, and the Grand Marais Harbor.
So whether you are a beginner or an experienced snowshoer, this area has something for you.
Getting There
In the town of Grand Marais, you will see a sign that reads “Grand Marais RV Park and Campground” and “Municipal Campground and Marina” right there on the corner of Highway 61 and 8th Ave W. You will see if before you reach the main downtown area if entering down from the Duluth side, or after you pass downtown if entering on the Canada side.
Turn there (towards the lake) and continue straight on 8th Ave W until you almost reach the lake. Turn right and drive past the campground area and baseball fields until you come to an opening in the trees. This is known as Lake Park and where you will find the trailheads for both loops.
The Lake Loop is a bit shorter, flatter, and easier to navigate. The Overloop Loop is quite a bit steeper and less maintained (although, very popular!). If you take both loops you’re looking at about 1.5 miles of walking, although in a much tighter area than the other trails on the list. The two loops together almost form a figure 8 with little repeat on sections- so you basically get a new vantage point each step of the way.
While the Overlook Loop is more of a challenge, the views from the top are rewarding! And the covered picnic areas along the trails are great for enjoying a lovely wintertime picnic during your adventure.
Map
Click Here to View a Map of Grand Marais (PDF, take you to the Visit Cook County Website). Sweetheart’s Bluff Natural Area is marked on the southwest corner of the map.
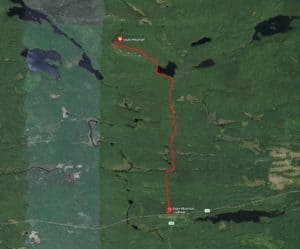
While not commonly recommend for snowshoers, we’ve added Eagle Mountain to our list of favorite snowshoe hikes for 3 reasons:
For one, it’s a very challenging hike! Even when not in snowshoes, the nearly 650-foot elevation gain to the highest point in Minnesota is strenuous. Add in deep snow and snowshoes and you have yourself a great workout!
Second, it’s a much longer hike than most mentioned on our list. This is a 6.3 mile out and back trail. While short hikes are ideal if you only want to spend a small part of your day snowshoeing, there’s a lot to be said to dedicating more than half a day to having an outdoor adventure. Bring a lunch! You’ll probably be hungry by the time you hit the top.
The final reason is because this hike is not nearly as popular as the others on the list. This adds both to the challenge of the hike, but also the reward. Quiet, peaceful, and beautiful are word that can describe the Eagle Mountain hike any time of the year, but especially in the winter. Enjoy the solitude as you are not likely to run into another snowshoer as you would be on the other trails.
Getting There
Eagle Mountain is located northwest of Grand Marais. Take the Gunflint Trail out of Grand Marais for about 3.5 miles to Devil Track Road. Turn left onto Devil Track Road and continue on for 5.7 miles. Turn right onto Ball Club Road for 5 miles. Then, turn left onto The Grade. Follow The Grade for another 5 miles. You will see the Superior Hiking Trail trailhead sign and parking area on the right hand side of The Grade at the intersection with Bally Creek Road. Pull in, park, and look for the trailhead to your north.
Alternative Route: From Lutsen you can take Caribou Trail until it ends at The Grade. Turn right and you will see the trailhead parking lot a few miles down the road.
The scenic hike will take you alongside the Cascade River and Whale Lake before reaching the peak of the mountain. From the top you will be greeted with incredible views of at least a dozen lakes.
Map
Click Here to View the Superior Hiking Trail Map Cascade State Park to Bally Creek Road (JPG)
The Pincushion Mountain Trail system is a mecca for cross-country skiers in the area, with miles of beautifully groomed trails. However, until 2019, it left snowshoers out of the mix as snowshoeing is not allowed on groomed trails. Luckily, a section of the Superior Hiking Trail at Pincushion Mountain opened up for winter snowshoeing, bringing snowshoeing access to this beautiful area.
Getting There
From Grand Marais, take the Gunflint Trail just a couple of miles and you will see the Pincushion Mountain sign. Turn right onto Pincushion Drive and continue until you reach the parking area.
First thing you’ll want to do is enjoy the incredible view of Grand Marais from this point. It’s unbeatable! Then, locate the Superior Hiking Trail section for snowshoeing. A map, as well as the trailhead, can be found at the east end of the parking lot (remember, Lake Superior is south!) on the mountain biking kiosk. Do not snowshoe on the groomed, marked cross-country ski trails that start on the north end of the parking lot by the main kiosk!
This is a 3-mile loop that is relatively flat, although it does have some areas of incline.
Map
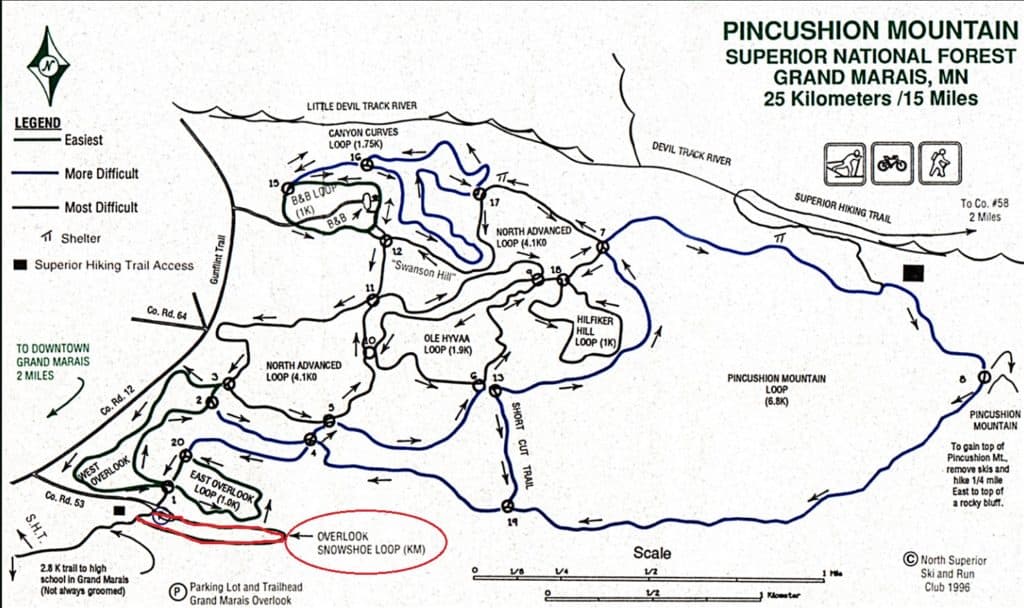
Click Here to View the Pincushion Mountain Cross-County Ski Map (JPG). Note that the snowshoe trail is NOT marked on this map.
More info coming soon!
More info coming soon!
More info coming soon!
More info coming soon!
More info coming soon!
More info coming soon!